Securing Nuxt API Routes with Nitro Utils

Building secure API routes in a Nuxt app often ends up messy because every endpoint needs its own authentication checks. When you’re using Nitro and nuxt-auth-utils, it’s easy to repeat the same session-validation code everywhere, which leads to duplication and mistakes.
A better approach is to create a reusable secure handler that verifies the user session once and plug it into all your server routes. This keeps your backend clean, consistent, and much easier to maintain.
TL;DR: What You’ll Learn
We create a secure handler in a Nuxt app using Nitro + nuxt-auth-utils to validate sessions, then reuse them across every API endpoint.
You can check out the full example github repository here: https://github.com/saikksub/nuxt-auth-utils-test on GitHub.
Setting up Nuxt + Auth Utils
You can skip this section if you’re already familiar with setting up a Nuxt project with
nuxt-auth-utils.
To set up a fresh Nuxt project, run:
npm create nuxt@latestInstall nuxt-auth-utils using:
npm i nuxt-auth-utilsAdd the module to your nuxt.config.ts
export default defineNuxtConfig({
  ...,
  modules: ['nuxt-auth-utils'],
  ...
})
Add your session password to the .env file (at least 32 characters):
NUXT_SESSION_PASSWORD=your-strong-session-key-hereThat’s it — this sets up nuxt-auth-utils for your Nuxt project!
Let’s Set Up a Simple Login API Route
To demo how the secure handler works, we’ll create a simple login API route inside the /server/api directory.
This route will use hard-coded credentials just for the example. If the credentials match, we’ll create a user session using
setUserSessionfromnuxt-auth-utils. This gives us a fake “logged-in” user that we can use to test protected API endpoints.
And here’s the sample code you can include:
// server/api/auth/login.post.ts
export default defineEventHandler(async (event) => {
  const body = await readBody(event)

  // Hardcoded demo credentials
  const isValid =
    body.email === 'demo@example.com' &&
    body.password === 'password123'

  if (!isValid) {
    throw createError({
      statusCode: 401,
      statusMessage: 'Invalid credentials'
    })
  }

  // Create user session
  await setUserSession(event, {
    user: {
      id: 1,
      name: 'Demo User',
      email: 'demo@example.com'
    }
  })

  return { success: true, message: 'Logged in successfully' }
})
Now, add the layout and page rendering components to your app.vue:
<NuxtLayout>
  <NuxtPage />
</NuxtLayout>
This is what the full file looks like (adjust based on your existing app.vue):
<template>
  <div>
    <NuxtRouteAnnouncer />
    <NuxtLayout>
      <NuxtPage />
    </NuxtLayout>
  </div>
</template>
This setup in
app.vueis required because Nuxt uses layouts and pages to structure the app.<NuxtLayout>loads the active layout, and<NuxtPage>renders whatever page the user is visiting.
Create a new file at app/pages/index.vue. This page will hold the login form and the logic to call our login API.
Now, create our login page under the login page and place the following code:
<template>
  <div>
    <p v-if="message" style="margin-top: 10px;">
      {{ message }}
    </p>
    <form style="margin: 10px;" @submit.prevent="login">
      <div>
        <input v-model="formData.email" placeholder="Enter email"></input>
      </div>
      <div style="margin-top: 10px;">
        <input v-model="formData.password" type="password" placeholder="Password"></input>
      </div>

      <button type="submit" style="margin-top: 10px;">
        Login
      </button>
    </form>
  </div>
</template>

<script setup>
const formData = reactive({
  email: 'demo@example.com',
  password: 'password123'
})

const message = ref('')

const login = async () => {
  message.value = ''

  try {
    const res = await $fetch('/api/auth/login', {
      method: 'POST',
      body: formData
    })
    message.value = res.message || 'Login successful'
  } catch (err) {
    message.value = err?.statusMessage || 'Login failed'
  }
}
</script>
This login page is straightforward and meant purely for the demo. Here’s what the code is doing at a high level:
- The page shows a simple login form with email and password fields.
- When the form is submitted, it sends the data to
/api/auth/loginusing$fetch. messagedisplays either a success message or an error from the server.- The form uses
@submit.preventto avoid page reloads and handle everything in Vue.
$fetchis Nuxt’s built-in wrapper around the native fetch API — it automatically handles JSON, applies your app’s base URL, manages errors more cleanly, and works the same on both client and server.
Now, let’s add a page under app/pages/app/home.vue that should only be accessible when the user is logged in.
<template>
<div>
"Your Secret" — This is secure page
</div>
</template>
<script setup>
definePageMeta({
middleware: 'auth'
})
</script>The page includes middleware: ['auth'], which tells Nuxt to run the auth middleware before loading the page. This is how we protect routes. The middleware’s job is simple: check whether the user has an active session, and if not, redirect them to the login page.
Now, let’s add our middleware under app/middleware/auth.ts. This middleware will check the user session and control access to protected pages.
export default defineNuxtRouteMiddleware(async () => {
  const { loggedIn, fetch: fetchUserSession } = useUserSession()

  await fetchUserSession()

  if (!loggedIn.value) {
    return navigateTo('/')
  }
})
This middleware runs before the user enters a protected page. Its only job is to check whether a valid session exists and redirect the user if they are not logged in. Here’s what it does step by step:
- Uses
useUserSession()to access the current session state. - Calls
fetchUserSession()to make sure the latest session data is loaded. - Checks
loggedIn.valueto see if the user is authenticated. - If the user is not logged in, it redirects them to
/. - If the user is logged in, the page loads normally.
This ensures that only authenticated users can access routes that use this middleware.
Up to this point, we’ve set up everything needed to reach the main goal. We created a login flow, a protected page, and the middleware that checks user sessions. With these basics in place, we’re ready to build the real piece we came here to learn: a reusable server utility that securely validates sessions in all our API routes.
Setting Up Reusable Server Utils to secure API
Let’s add a utils folder and create a secure.ts file inside it. This is where we’ll define our secure event handler that checks the session before allowing any API logic to run.
// server/utils/secure.ts

export const defineSecureHandler = (handler) =>
  defineEventHandler(async (event) => {
    try {
      const { user } = await getUserSession(event)
      const isLoggedIn = user?.id ?? null

      if (!isLoggedIn) {
        return createError({
          statusCode: 401,
          statusMessage: 'Unauthorized'
        })
      }

      // do something before the route handler
      const response = await handler(event)
      // do something after the route handler
      return { response }
    } catch (err) {
      // Error handling
      return { err }
    }
  })
This utility wraps any API handler and adds a session check before running the actual logic.
- It reads the user session using
getUserSession(event). - If no valid user ID exists, it returns a
401 Unauthorizederror. - If the user is logged in, it runs the original handler.
- It allows “before” and “after” logic around the handler.
- It catches errors so your API doesn’t crash.
Now let’s add a secure API endpoint under server/api/app/ping.ts that uses the Nitro util we just created.
export default defineSecureHandler(async (event) => {
  const { user } = await getUserSession(event)

  return { id: user.id }
})
And here’s what the code is doing in simple terms:
- It uses our secure wrapper, so only logged-in users can access this route.
- Inside the handler, we read the current user session again (already guaranteed to exist).
- It returns the logged-in user’s ID as the response.
Now, let’s call this API from both the login page and the home page to check how it behaves with an active session and without one.
In app/pages/app/home.vue:
<template>
<div>
"Your Secret" — This is secure page
</div>
</template>
<script setup>
definePageMeta({
middleware: 'auth'
})
onMounted(() => {
$fetch('/api/app/ping')
.then((res) => {
console.log(res.id)
})
.catch((error) => {
console.error(error)
})
})
</script>In app/pages/index.vue:
<template>
  <div>
    <p v-if="message" style="margin-top: 10px;">
      {{ message }}
    </p>
    <form style="margin: 10px;" @submit.prevent="login">
      <div>
        <input v-model="formData.email" placeholder="Enter email"></input>
      </div>
      <div style="margin-top: 10px;">
        <input v-model="formData.password" type="password" placeholder="Password"></input>
      </div>

      <button type="submit" style="margin-top: 10px;">
        Login
      </button>
    </form>
  </div>
</template>

<script setup>
const formData = reactive({
  email: 'demo@example.com',
  password: 'password123'
})

const message = ref('')

const login = async () => {
  message.value = ''

  try {
    const res = await $fetch('/api/auth/login', {
      method: 'POST',
      body: formData
    })

    navigateTo({ path: '/app/home' })
  } catch (err) {
    message.value = err?.statusMessage || 'Login failed'
  }
}

onMounted(() => {
  $fetch('/api/app/ping')
    .then((res) => {
      console.log(res.id)
    })
    .catch((error) => {
      console.error(error)
    })
})
</script>
You’ll notice that after logging out, the /api/app/ping endpoint returns a 401, and once you log in again and visit the home page, it responds correctly with your user data.
When you log in, you’ll see the console show a successful response from /api/app/ping, confirming the session is active.
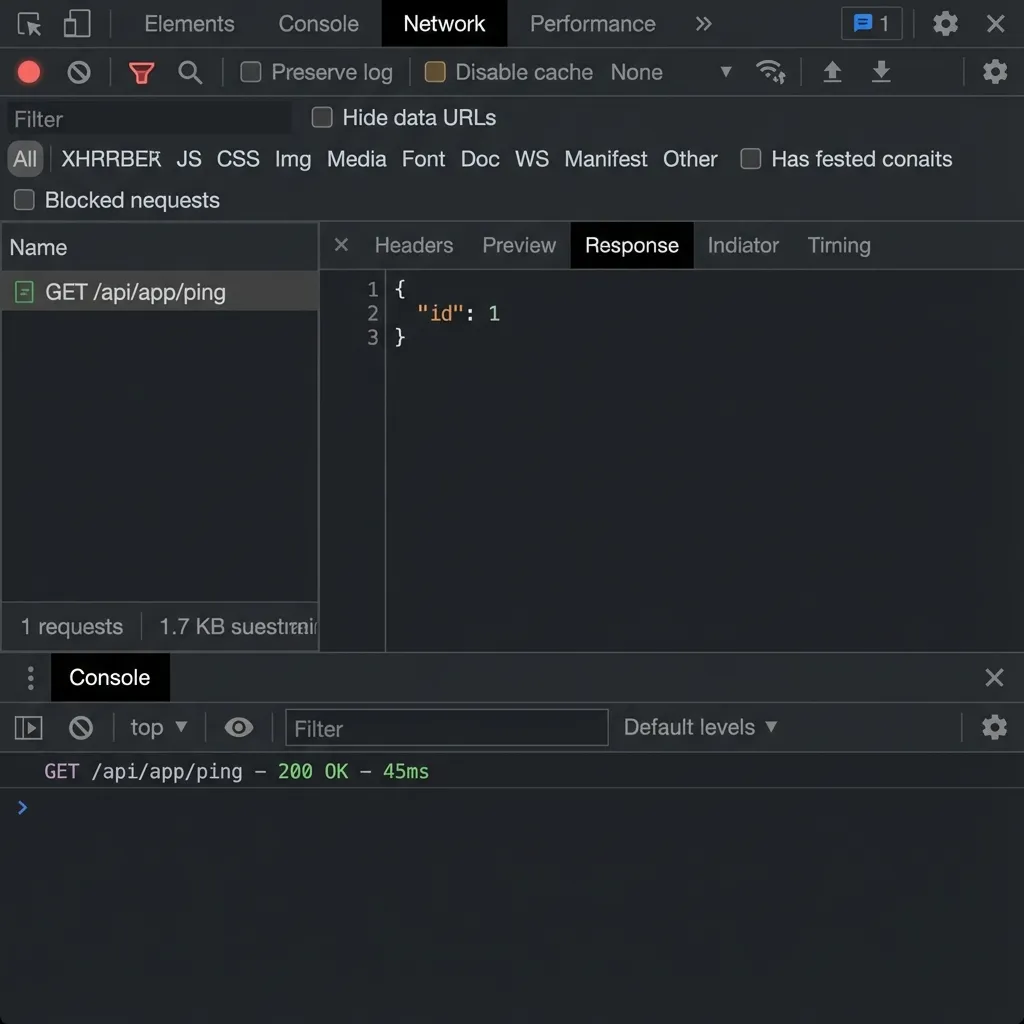 Console log showing a successful response from secure API endpoint
If you clear your site cookies, you’ll be logged out because the session cookie gets removed. Refresh the browser and you will redirected back to login page, because of the router middleware.
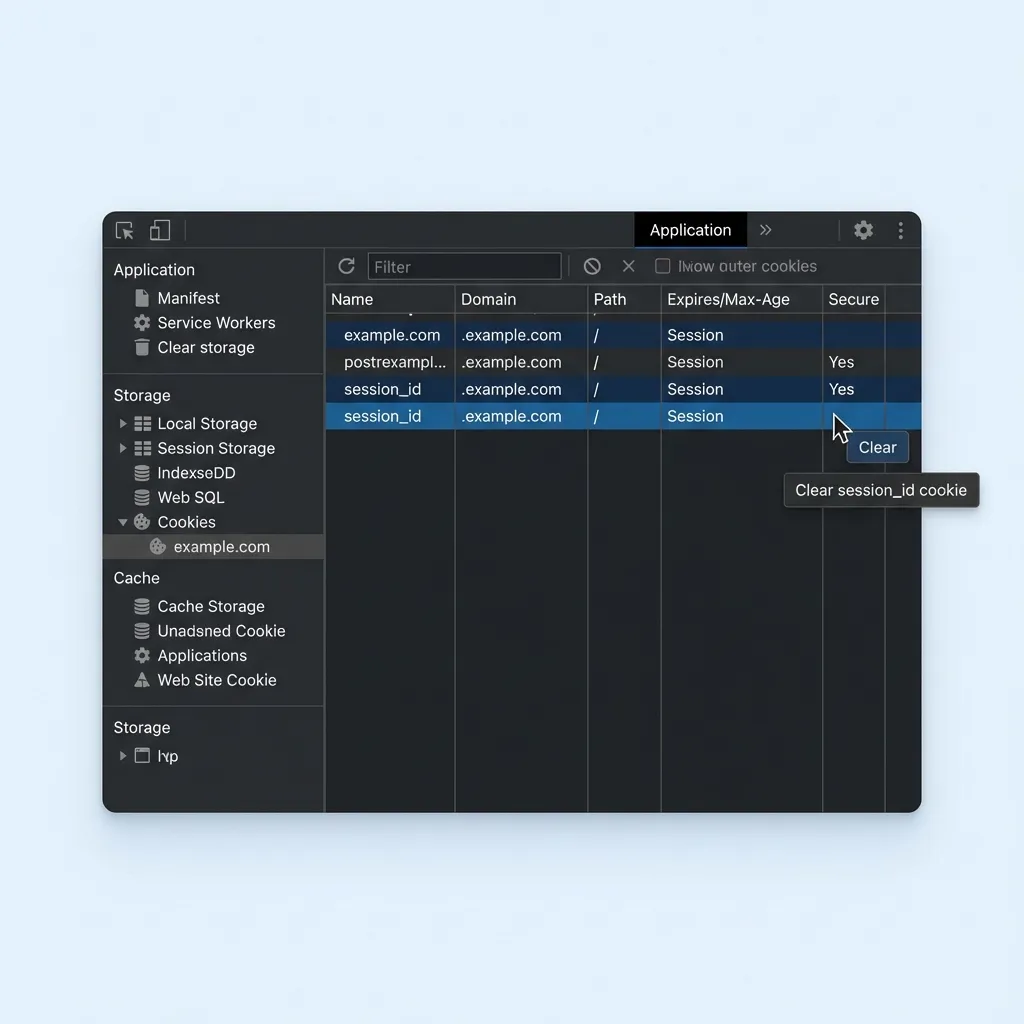 Logout by clearing site cookies
After you log out and from the login page, you’ll see it fails with a 401 because there’s no active session.
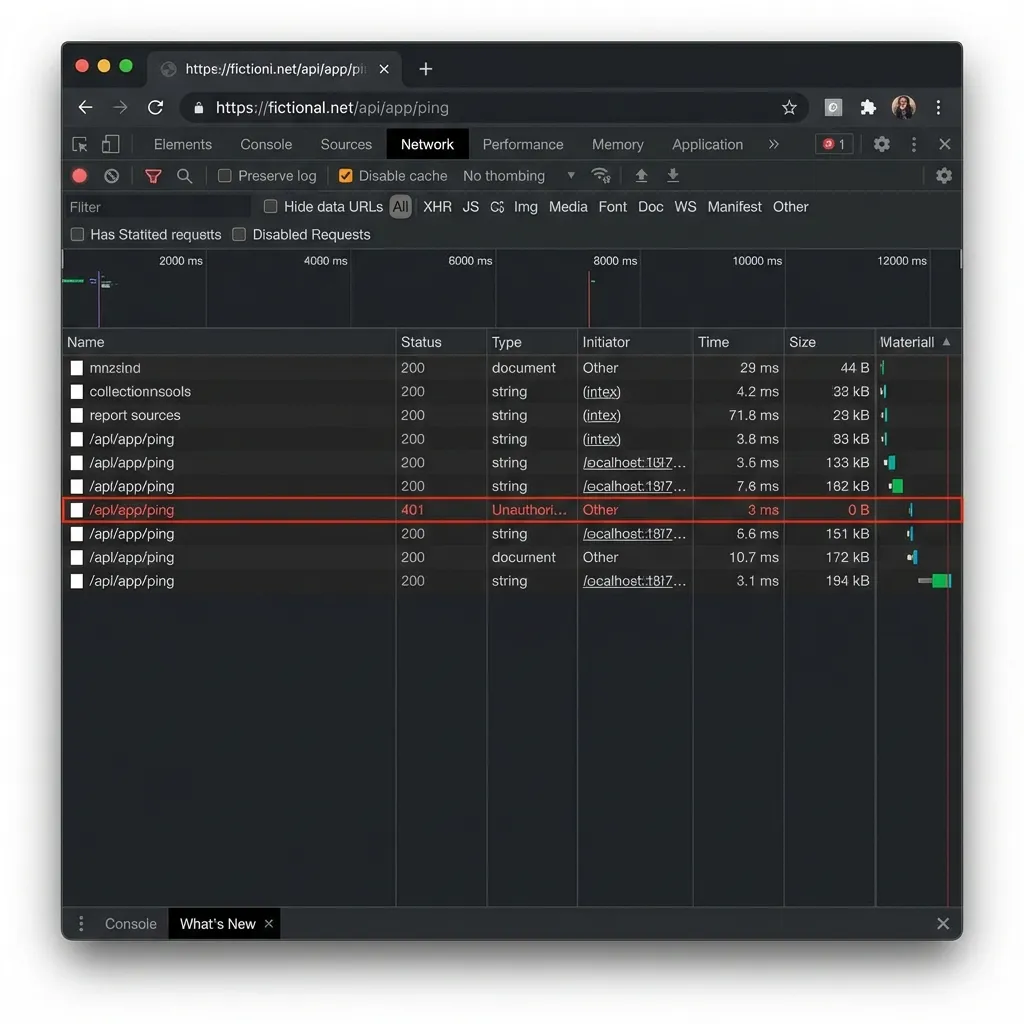 After you logout and in the login page you will see failed attempt to the Secure API
Using a Nitro util as middleware gives you a clean, reusable way to protect your API routes. Instead of writing the same session-checking code in every endpoint, you wrap your handler once and let the util do the heavy lifting. This keeps each API file focused only on its real purpose while the shared logic—auth checks, error handling, pre-processing, post-processing—lives in one central place. It’s easier to maintain, reduces bugs, and makes your API structure more consistent as the project grows.
You could also write this logic as a Nitro middleware using the
/server/middlewarefolder, but Nitro middleware is applied to all routes by default.You could also put this logic in Nitro’s
/server/middlewarefolder, but that middleware runs on every route. There may be a way to skip middleware for certain public routes, so make sure to read up on that before choosing your approach. I prefer the reusable util pattern because it’s more modular—each API explicitly decides whether it wants protection—and it gives clear control over which endpoints require authentication.
Reference Repository: https://github.com/saikksub/nuxt-auth-utils-test